Sunday, November 18, 2012

A Man Walks Into a Red Door - Doh!

It all started when we bought a house... wait, you know about that. Let me try again.

Well, it all started when we painted said house - again, we've covered that, haven't we? Hmm...

The house looked dumb with a white front door. There, that sets the tone I'm looking for. Our neighbors already have a great lime green front door, and the next logical choice was to go with a regal red.
 See the image to the right there? Imagine a white door there. Apparently I didn't take any house photos post-painting pre-door-painting. It figures.

Anyhow, I took down the doors. Roughed them up a little, taped up the parts that need to contrast, and hosed them in some rustic red something or other. It's perfect, and I haven't a clue what the color is.


This wasn't a bad way to spend a warm Saturday. The only problem that arose was running out of paint. Katie was out running errands, and here I was halfway finished and no doors on my house. 


A quick check with a neighbor who was outside, and off I went. Two cans of paint in hand, I fogged the rest of the front door, and then unloaded on the back door. The back went much smoother, as it was new - here I go again repeating stories you can go back to read.


Hanging the doors back up, that was a trick and a half. I got it done, but it isn't something I want to do on a weekly basis. Maybe once more, this decade.


No, wait. It's colonial red. Thank you Katie!


Now, we have a patriotic looking house. Take a moment, say the Pledge of Allegiance for me.

Side projects were also addressed: foundation was painted with extra grey from the porch. Additionally, that terrible wire along the outside of the house, that the Verizon guy thought I wanted making our house look like a dump, I moved that to the wall directly inside from the FiOS box. Verizon FiOS, if you are reading this, stop contracting out to morons who don't take even a slight interest in the quality of the installation. That or warn us before we pay for a full installation that the installer will do a terrible job.


There, that looks better.

Lastly, I put a new set of blinds in the kitchen.

They're nice. It's a nice house. But OH BOY wait until I tell you about the gable vents! I'll bring this story about until another day. Tomorrow, perhaps, if I have time. maybe over Thanksgiving.

Hey, Happy Thanksgiving! Do something constructive to your own home this weekend!


Saturday, November 17, 2012

Can Jam!

Worst before photo ever.
After painting Dueselhouse, there was a moment of "wow, great idea!" It was Memorial Day Weekend, and everything in Virginia which was labeled "green" was tax free. Low flow toilets are green, and the bathroom in Dueselhouse wasn't sporting a very spectacular throne.

A one piece micro-seat wasn't very great to perch upon, and with taxes set aside for the weekend, I decided that it was time to make a change.

New wax ring
 Glacier bay makes a good looking can that my parents have at their place on Cape Cod. Dual flush, extra tall, and the deep oval make this bathroom addition very accommodating. My dad helped with the installation, and I must say that aside from having to think about what goes through the drain as you clean out the old wax ring, it wasn't a difficult installation - though it was good to have the insight and experience to help me through it all.

Economically speaking, water doesn't cost a whole lot, but there's piece of mind having a positive impact on the amount of water used. This, roughly hundred dollar upgrade, was probably as awesome as painting the upstairs bathroom - not necessary, but really great return on the enjoyability of the user experience.
Katie didn't like having a toilet in the living room. Odd.

Progress

Finished! All told, 25 minutes elapsed.

Step up, sit down, and consider the goodness.

Wednesday, October 24, 2012

Shabby to Fabby (What is Fabby?)

My apologies, faithful reader, for not returning sooner to share with you our developments. Duesehouse has been all a-spin with our busiest season - back to school, and busy events across the country keep Jeff and Katie on the run an awful lot.

Do not let our lack of writing fool you, we've been quite busy around Dueselhouse, from plumbing improvements, exterior polishing, and we even found a little time to paint this old pile of sticks. Not just the bathroom this time, the house!

See that green mess over there, that is about to be gone. you will see how gone in the picture directly below this statement. Seriously, scroll down a bit I'll wait... see, I wasn't kidding.


Pretty sweet, right?  That's my house.

Some special thanks for all the help:

  • Mom and Pop Duesel
  • Carolyn of Graham Road El. and her husband Luke were in around 10am! 
  • Stacy joined the party and thought we were done, but we had only finished two sides at that point.
  • Summer and Aura (my biggest helper!) showed up and Aura really got into the painting. 
  • John, of attic furniture fame, came and painted the southern facing eave with the precision of Rembrant. It looks magnificent!
Believe it or not, the house painting started around 8am, and we were magically finished before 5am. Not bad. I still maintain that the house could have been painted in an hour. 8 hours isn't shabby though!

More photos to come!


The next weekend I was out in Pennsylvania four wheeling with some people from the Off Camber Crawlers. The house was ready for some final touches. The door still needs painting, the foundation is still green, and a lot of photos still need to be uploaded to my folder. 

But rest assured, the house got a fresh coat!
Thanks for the help, Aura!

Tuesday, September 11, 2012

A Short Story Titled: Improving the Yard, or Pleasing the Neighbors

This is a writing sample I shared with my students:


Saturday morning, I woke up. "It's time to plant a garden," Mrs. Duesel told me. "Ok," I said. We got up and had breakfast. We drove to the garden center and looked at plants. We drove home, the Jeep was filled with plants. We dug holes, and filled the bottom with mulch and plant starter water. We put the plants in the holes and filled around them with dirt and more mulch. We watered the new plants. There were Camellia, Golden Euonymous, Firepower Nandinias, and Gardinia's. We went inside and had dinner. The end.

This was my second version:


My hands were black with soil, and my knees were raw from the hard ground. I pushed one final handfull of soil around the last Gardenia. Brushing myself off, I stepped back to where Mrs. Duesel was standing. Crossing my arms, I admired the Camellia, Golden Euonymus, Firepower Nandinias, and Gardinia's. It was our first garden!


It was a lesson on how to write about the moments of the good stories you have, not telling every booring bit of the day leading up to your real story. Being one who is long winded, I need to be reminded of that myself. 
Peggy's Design

We planted a garden.


It started a week or two ago, when we stopped to talk to the plant guru at Craven's Nursery. Peggy looked at a picture of the house on my phone and came up with a drawing and ideas - along with what we thought (guessed) was reasonable pricing. So we bought what we thought would be the first of several purchases for the front yard, and set an order for a couple of Golden Euonymus.

Katie shuffled off on business, while I dug holes and watered diligently. over a week later, Katie had been home almost four days before I remembered to ask if she had ever heard from the garden shop. 

The answer was no.

They called the next day. We, of course, bought the rest of the plants in one fell swoop. Last I checked, you only live once.

The lineup was like this, from the steps out:
Golden euonymus flanking the steps, a nandinia "Firepower" is next, then a gardenia, and another firepower, with a camellia ending each row. 
The golden has a nice yellow tint, the firepower turns red in the fall and keeps its leaves through the winter, and finally the camellia will flower in the winter, around Christmas.

The clay that makes up the topsoil around Virginia needed to be cut with find grind mulch. We prepped the soil with some wild plant starter that packs the soil with vitamin B12, and that's the bulk of the task. Not a bad way to spend a Saturday. 

It looks good. Dueselhouse is looking pretty sharp now, we have officially been upgraded from "worst house in the neighborhood" status to "just another house on the block," which is a big step. Just imagine what will happen when we slap a fresh coat of paint this place.

BOOM!


This place is gonna be changing its facebook status!
In a relationship!

Sunday, August 26, 2012

Why is This Even a Project?

Picture if you will, a yard.

It could be any yard.

For todays sake, let's imagine a back yard. From the house, it is about fifteen feet deep, and maybe eighty feet long. There is a low chain link fence around it, and some will say that it is a glorified dog run.

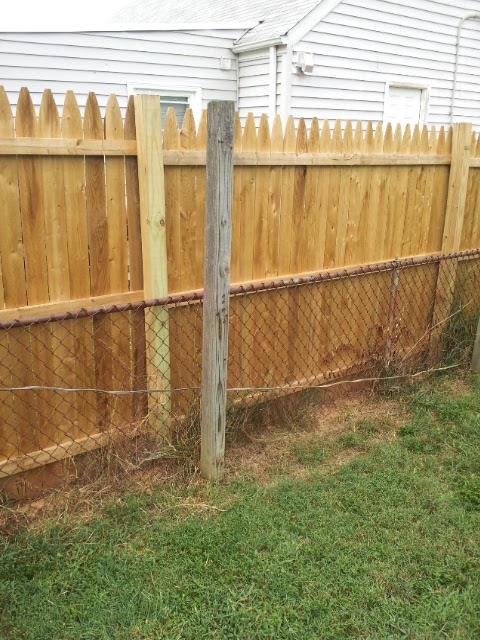
See all those confusing fence posts?
There is a shed in one corner, some chairs, and a barbecue by the house; so you could call it,  "Frankie's domain" if need be.

Now, to add to our imagined yard, let's put in a family who wanted to make this glorified dog run a more private sanctuary from their neighbors. We can assume that the chain link fence isn't the most attractive feature, and maybe, there was a time, when the neighbors yard wasn't very attractive.

So what would you do? Sink a hand full of fence posts and add a lumbar-yard-special privacy fence along the inside of the back of the chain link fence!

Of course, that is completely logical. Because, we already said, this could be any yard, right?

Well it isn't just any yard, this mess is right out back of Dueselhouse, and fast-forward a foreclosure and who knows how long later, there still stands that hand full of fence posts along the inside of the low chain link fence. Underscoring the fact that this feature isn't very attractive, the neighbors have upgraded their property and put up their own privacy fence!

It's ugly.

What's a new-homeowner to do? Build a fence to hide the neighbors privacy fence, the low chain link fence, and the useless posts? Terrible idea. Suck it up and ignore it? Not for more than a month or two. Sell the house? That begs you to consider my commute, not going to happen! Finally, it's time to face the facts, those posts need to come out!

So I dug one out.

Not too bad, I dug next to it to gain leverage, and the post was only sunk about two feet in. The cement footing was only six inches deep! Cake walk.

I filled in the holes with dirt and dead grass I had scraped off the driveway (another story to be written) and preserved what grass I could - thank you rain, for helping keep the sod alive!

I have to admit it was almost fun!

Here's the original process I developed:

This is a dumb fence post


STEP 1: Carefully dig sod from in front of post 


STEP 2: Dig more, set soil aside (preferably on a tarp, which I didn't)


STEP 3: Shake the everlivingshebam out of the post to get it loose. 


STEP 4: Pull the post from the ground, feel like a bear with the strength of ten bears! Dance around in celebration, realize no one is watching ("Katie, come outside and appreciate my masculinity!" to which you hear mumbles about busy microwaving dinner or Glamor magazine, or something)  Rub your spine and realize you're getting old. Then move on to STEP 5

STEP 5: Put fill soil into the now gaping hole in your once beautifully immaculate yard. Remind yourself that this will be a temporary step back to making it again beautiful. 


STEP 6: Gently rake soil into the hole, replace sod you mercilessly ripped from the ground earlier, tamp it down, step back, appreciate your work. Great job!


There's more than one post to a fence though. So Get back to step 1, you lazy so-and-so...


If you're feeling a little under appreciated, look for treasure in the digging:
Who says yardwork doesn't pay? That 1922 Quarter is worth $64k... or is it only 4 years old?

Now, I'm going to ask if you looked at the title, Why is This Even a Project? Because the 6 Steps sound easy. First, it digs a pretty big hole in the ground. Second, as I found out on post #3, sometimes they get stuck on something underground.

I had to cut some of the chain link fence that was trapped in the concrete footing (can we even call that a footing?) Yet it still wouldn't come out. Rather than pull every tendon in my spine out, I decided to think of what else I could do. I needed to pull harder than I could. My Jeep wouldn't fit through the gate, and I don't have a winch.

"Hmm... maybe my highlift will get the job done! I just drilled a couple holes beside one another, these would serve as a lifting point for the jack, and a couple of clicks and the post came right out.


This was almost too easy!

For the rest of the posts: I dug a smaller hole, just enough to get the foot of the jack under the concrete. From there, I jacked up to the top of the post, and filled back in the now smaller holes. It was super simple, and the yard looks GREAT!

Here's the new steps:
NEW STEP 1: Drill holes for jack, dig small hole at base of post.

NEW STEP 2: Get the jack in there.
 

NEW STEP 3: Lift the post out with a few pulls.
Bonus points if you get help from a friend.


NEW STEP 4: Fill in the gaping hole as in [old] Steps 5 and 6, and stack the posts wherever you transition your trash.


There is one post left, but it is buried in ivy and a tree stump. Also there is a clothes line post that is REALLY deep in the yard. That's a project for another day. Soon though.

And a special thanks to my assistant for the third half of the project!